How to Change Brake Pads: A Comprehensive Guide
Changing your vehicle's brake pads is a fundamental aspect of car maintenance that can significantly impact its safety and performance. This comprehensive guide will walk you through the entire process of changing brake pads, offering expert tips and insights.
Understanding Brake Pad Importance
Brake pads are critical components of your car's braking system. They are responsible for creating the necessary friction to slow down or stop your vehicle. Over time, these pads wear down and require replacement to maintain optimal braking performance. Understanding their role and knowing how to check for the signs of brake pad wear is crucial for timely maintenance.
How Brake Pads Work To Stop Your Vehicle
Brake pads and rotors work together to slow down and stop a vehicle. When the brake pedal is pressed, hydraulic pressure is applied to the brake calliper, which contains the brake pads.
The brake pads, typically made of friction material like ceramic or metallic compounds, are pressed against the brake rotors (discs) attached to the vehicle's wheel. This contact creates friction, converting the kinetic energy of the moving vehicle into heat. The heat generated by this friction causes the brake pads and rotors to wear over time. As the brake pads wear down, they will eventually need replacing to maintain effective braking performance.
How to Change Front Brake Pads
Front brake pads typically wear faster than rear pads, particularly for front-wheel drive vehicles. This guide will take you through the steps to replace the front brake pads.
How to Change Rear Brake Pads
Changing rear brake pads can differ slightly from front pads. Learn the nuances to ensure a successful replacement.
DIY Tips for Changing Brake Pads at Home
Our number one DIY tip for changing brake pads at home is to ensure that your vehicle can be raised safely and securely, ensuring your safety during the process.
Next, make sure you can identify the tools you will need and which parts of the car you will be working with. This preparation not only makes the process smoother but also ensures your safety throughout.
Prepare to Replace Brake Pads
1. Gather The Necessary Tools and Materials
Ensure you have the essential tools to complete the job:
- a floor jack
- jack stands
- wheel lock key (if needed)
- breaker bar or impact wrench for lug nuts and calliper mount brackets
- socket set for calliper and slide pin removal
- impact screwdriver for disc-to-hub screws (if necessary)
- brake cleaner cans and rags for cleaning,
- a C/G clamp or speciality calliper wind back tool to push the pistons back in.
2. Safety Comes First: Essential Precautions
Once you have your tools ready, make safety your top priority.
Wear protective gear that covers your body and protects your skin, feet and eyes. Ensure your car is securely lifted and safely supported, before starting any work. Check that the equipment you will use is in good condition.
Step-by-step Guide to Changing Your Brake Pads
1. Lift the Vehicle
Drive your car onto raised supports (ramps) or use a high-quality jack to lift your vehicle. Ensure the vehicle is stable and securely supported before you remove the wheel from the vehicle.
Pro Tip: always support your vehicle securely using vehicle stands. Jack up your car and then ensure it is securely supported. Never work on a vehicle that is not supported by vehicle stands.
How To Remove Old Brake Pads
2. Remove the Wheel
Remove all wheel nuts/bolts holding the wheel to the hub. This may require the use of a special key for locking wheel nuts.
Pro Tip: Place the wheel under the car next to the jack stand as a safety fallback in case a jack stand fails.
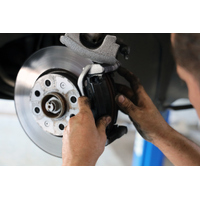
3. Detach the Brake Calliper
There are a few different calliper types, and each requires a different procedure to remove it. Floating callipers are found in most modern vehicles, however, some older vehicles may have ‘solid mount’ or fixed callipers.
Floating callipers
Here is how to detach floating calipers:
1. Remove the two slide pin bolts
2. Slide the calliper off
3. Secure the calliper so it does not hang from the hose, as this may damage the brake hose. This can be achieved using a occy strap or zip tying the caliper to the spring on the strut tower.
Pro Tip: If the calliper does not slide off easily, it may be pushing up against the piston, if the piston is in the outward position. You may need to wiggle the calliper a few times or push a screwdriver against the old brake pad to push the piston inwards enough to allow easy removal of the calliper.
Solid mount (fixed) callipers
Remove solid mounted callipers like Brembo and AP Racing using the following steps:
1. Unbolt or tap out the pins to remove all springs and clips holding the brake pads in place (Take note of the orientation of the spring clips! This will help with re-assembly)
2. Unbolt the calliper from the mount
3. Secure it in a stable position.
How To Install New Brake Pads
6. Check you have the correct new brake pads
Before installation, compare the old brake pads to the new pads to ensure correct fitment. This can be done by simply putting the new pad against the old pad.
If you are unsure which brake pads you need, the expert team at Empowered Auto Parts can match you with the right product for your vehicle make, year, model and use. We have:
7. Apply brake grease
Once you have confirmed that you have the correct replacement brake pads, apply a small amount of brake grease to all metal-on-metal contact areas. Make sure that you apply brake grease to:
-
slide pins
-
ears on brake pads
-
Metal on metal contact points
For more information on prevententing noise and applying hi-temperature rubber grease to pads, Take a look at our 3 Golden Rules to eliminating brake noise
Pro Tip: DO NOT apply any grease to the friction surface of the brake pad or disc.
It is critical to avoid this common mistake, which can create a safety issue when you test drive the new brake pads.
Any grease on the friction surface of the new brake pad can cause the brake pad to slip, instead of creating friction with the disc when you hit the brakes, putting your safety at risk.
8. Install the New Brake Pads
Place the new pads into the caliper carefully, ensuring they are correctly aligned and will not get caught or bound up in the hardware.
Pro Tip: Ensure proper brake pad-rotor alignment is essential to protect the lifespan of your new brake pads. Incorrect alignment can cause premature wear or damage.
9. Reattach the Brake Caliper and Wheel
Once the new brake pads are in place, reattach the brake caliper. Tighten all hardware to the manufacturer’s recommended torque setting.
Install the wheels, tightening all wheel nuts/bolts in a star sequence to the manufacturer’s recommended torque setting.
After Installing New Brake Pads: Ensure Quality and Safety
9. Check Your Work
After installation, it's crucial to check your work.
1. Ensure everything is reassembled correctly and there are no loose parts.
2. Pump the brake pedal a few times (do not exceed 50% pedal travel) to allow the pistons to extend and help locate the brake pads against the discs for the first drive.
3. Once the pedal is hard you are ready to test drive and bed in your new brakes.
Post-Installation Maintenance
Proper maintenance after installation extends the life of your new brake pads and ensures ongoing safety.
Brake Pads and Rotors: Understanding the Link
How Brake Pads and Rotors Work Together
Brake pads create friction against brake rotors, converting kinetic energy into heat and slowing down the vehicle. The pressing force by the brake pads on the rotating discs creates friction to decelerate and eventually stop the vehicle.
When to Replace Brake Rotors
There is a minimum thickness measurement provided by all manufacturers.
Use a set of vernier callipers to measure the thickness of your brake disc and check against the minimum thickness spec. Usually, if the brake rotors are within 0.5mm of the measurement, it is time for the discs to be replaced.
Other obvious signs that the brake rotors need replacing are:
-
Missing material off discs (old rusted units)
-
Brake shudder. Brake shudder can be fixed by machining the discs, however, shudder usually occurs when the rotors are due for replacement.
Learn more about brake shudder: What Causes Brake Shudder and Wheel Shaking?
FAQs on Brake Pad Replacement
Can I change brake pads myself? Yes, changing brake pads is a DIY task for many car owners. However, it requires some mechanical knowledge and the right tools. If you're unsure, it's best to consult a professional mechanic for safety reasons.
How should you replace brake pads? To replace brake pads, you should: lift the car, remove the wheel, detach the brake caliper, slide out old brake pads, compress the caliper piston if necessary, install new brake pads, reassemble the caliper, put the wheel back on, and test the brakes before driving.
How much should I pay to replace brake pads? The cost varies based on the vehicle and brake pad quality, averaging from AUD 150 to AUD 450 per axle, including parts and labour.
What happens if you don't grease brake pads? Not applying proper lubrication can lead to noisy brakes, reduced performance, and uneven wear. It's crucial to use brake grease sparingly in specific areas.
Should my brake pads be touching the rotor? Brake pads should not constantly touch the rotor. They should make contact only when the brakes are applied, with a few millimetres gap being normal when the brake pedal is not pressed.
How long will new brake pads last on bad rotors? New brake pads on worn or damaged rotors may wear out prematurely. It's advisable to replace or resurface the rotors for better brake performance and pad longevity.
How often to replace brake rotors? Replace brake rotors when excessively worn, damaged, or below the manufacturer's recommended thickness, typically every 48,000 to 112,000 kilometres.
How close should brake pads be to rotors? Brake pads should be close enough to make contact when pressed but not so close to cause rubbing against the rotor when not in use. A few millimetres gap is typical.
How long do brake rotors last? The lifespan depends on driving habits, vehicle weight, and road conditions, generally lasting from 48,000 to 112,000 kilometres or more with proper maintenance.
Conclusion
Changing brake pads is a vital maintenance task that can be accomplished with the right knowledge and tools. By following this guide, you can ensure your vehicle remains safe and performs optimally.
How to Change Rear Brake Pads
Changing rear brake pads can differ slightly from front pads. Learn the nuances to ensure a successful replacement.


